

- Pick a Domain name. Choose a descriptive Domain name for your WordPress website.
- Get your website online. Register your Domain name and get hosting.
- Customize your website. Choose a free theme template and tweak it.
- showcase your products and services.
- Write & publish blog posts.
- Promote your website.
The step-by-step guide on this post will show you how to create a website in a few hours. This guide is made especially for you as a beginner. I will walk you through step by step, using plenty of pictures to make it all perfectly clear.
If you get stuck or have questions at any point, simply contact us and we can help you out.
Lets dive right in; –
I know that starting a Website can seem overwhelming and intimidating. This guide is for you a beginner, and will teach you how to create a website with just the most basic computer knowledge. So whether you’re young or old, you can create your own website in a few hours.
On starting a website as a beginner, you are bound to make numerous mistakes but isn’t that’s how we all started out. Don’t be intimidated by something that doesn’t breath, you are born to dominate all.
So, just how do you start a website?
Learn how to create a website in a few hours by following these steps:
- Pick a domain name. Choose a descriptive name for your website.
- Get your website online. Register your domain name and get hosting.
- Customize your website. Choose a free blog design template.
- Showcase your products and services.
- Promote your website on line. Get more people to visit your website with proper marketing.
- Monetize your website. Choose from several options to monetize your website.
You should create a website
There is a general misconception that creating a website is for professionals, that is not true, because yes you can do it. Most people visit websites to learn through your experience, so simply to buy your products or services.
For example, visitors to a health and fitness website don’t want to read a novel from a fitness trainer, they want to relate with the experiences of someone who has actually done it before, becoming so strong and fit, mistakes he has gone through and all. They then go on to buy the website’s products and services they offer.
All that is required from you is your passion and will to sell.
At the core of it all, a website is about selling your products and services to the world. Writing about them in a passionate way and showcasing the bennefits of using them to the end user, As long as you are showcasing products and services people love and can actually use in day-to-day life , you will win the hearts of your visitors over and over again
Why create a website?
To Sell Products And Services
A website is a platform to showcase your products and services, and their bennefits to the user that visit your website in search of them. You can sell your products and services to the world and there are customers eagerly waiting out there. You can use your website as a blog where you can write about your experiences with your products and services so that the world can get first hand information.
To make money from home.
Your website is a form of passive income, think of paid ads, affilliate marketing, and your website blog. You can spend just a few hours writing content and then go on to profit from it long after the the writing is finished. With the covid pandemic and the new norm being working virtually, it becomes an attractive way to earn while observing social distancing by working from home
To Put your business on the world map
A successful website transforms your business into a global brand, and can gain you so much recognition in your respective field. Many brands are known worldwide as global leaders and experts just because of their websites.
To find and lead your community
Interaction is the core of creating a website, sale your products and services and customers buy them regardless of the geophysical location. Write a post and people comment on it. You can connect with people who are interested in your products and services all over the world. A WordPress website allows you to reach out and showcase your products and services and teach people based on your experiences, and it gives you the opportunity to learn from your customers as well.
Now let’s create your website
Step 1: Pick a Domain name
Pick any platform, or web hosting company, and choose a domain name.
If you’ve already got an idea for the domain name of your website, you can check to make sure that no one else has already registered it: most platforms offer both domain and web hosting facilities.
Note: You cannot use any spaces or punctuation other than dashes in a domain name.
If the name you want is already taken there are a few things you can do:
Try a different domain extension; get the .net or .org version of the name.
Add dashes between words; vic-falls.com
Choosing a Domain name
If you’re not sure of the best domain name to choose, there are a few ways to find your best domain name:
Products and Services
Products and services you are passionate about are a great place to start. Finance, law, travel & tours, digital marketing, cooking, travel, fashion, sports, and cars are all good examples. But even websites about more obscure hobbies can be successful, since your customers can be anyone in the world with access to internet.
Product websites.
A product website is a site that’s all about product sales. This will include different manufactured or digital products, from things your customers use on a daily basis to random products . This is an awesome way to sell your products and services to the world without having to stick to just one geolocation.
Service websites
A service website is a site that’s all about selling services. This will include different physical services or digital servicess, from services your customers require on a daily basis to random services for example; accounting, law, finance, digital marketing, car-repair, internet services and so much more . This is yet another awesome way to sell your services to the world without having to stick to just one geolocation.
When that is done, it’s time to choose your domain name (website name)
If you can’t get a good website name contact us we can help free
Step 2: Get your website online
Now that you’ve got a name picked out, it’s time to get your website online. This might sound hard or technical, but the steps below will walk you right through step by step.
To get your website up and running you need two things: web hosting (also known as hosting) and website software. The good news is that these typically come packaged together.
A web host is a company that stores all of the files for your website and delivers them to the user when they type in your website name. You must have a web host in order to have a website.
You also need WordPress website software, because it is the most popular, customizable, and easiest to use. The web host I recommend, and the one I show you how to use in this guide, is BlueHost I personally use BlueHost and I recommend them to all beginners because:
- They will register your custom domain name for free, making sure no one else can take it.
- They have a 30 day money back guarantee if you are unsatisfied for any reason.
- They offer a free, automatic installation of the WordPress website software
- They offer reliable web hosting that has been recommended by WordPress since 2004 and they currently host over 3.5 million websites.
- They have helpful 24/7 customer service via phone or web chat.
Use any BlueHost link on this site to get the special discount price of $2.50 per month.
. Click here to get the special $2.95 per month rate on BlueHost and then click “get started now”.
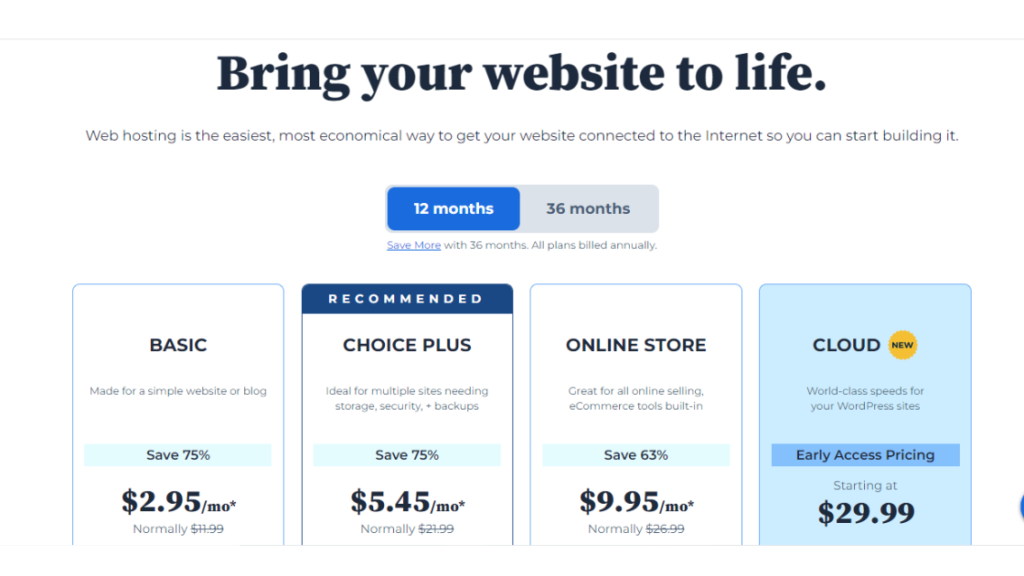
. Select your plan. I recommend First timmers to get the basic plan. Click “Select” to choose your plan
. Type in your domain name in the left box and then click “next” to start the registration process.
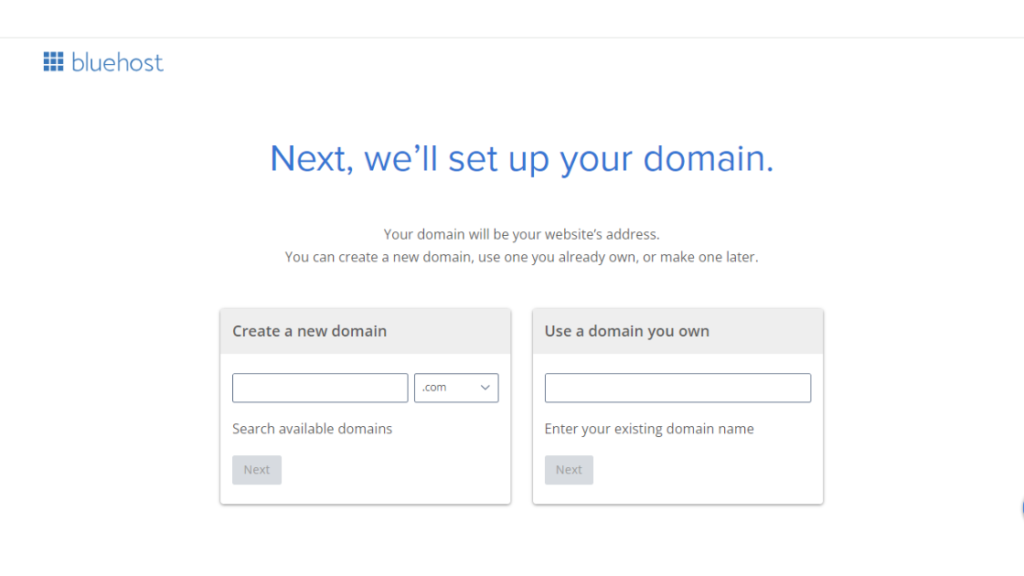
- If you already own a domain name and want to use it for your WordPress website, type your existing domain in the right box and then click “next”. Only use the right box if you have previously paid to register a domain! “pic”
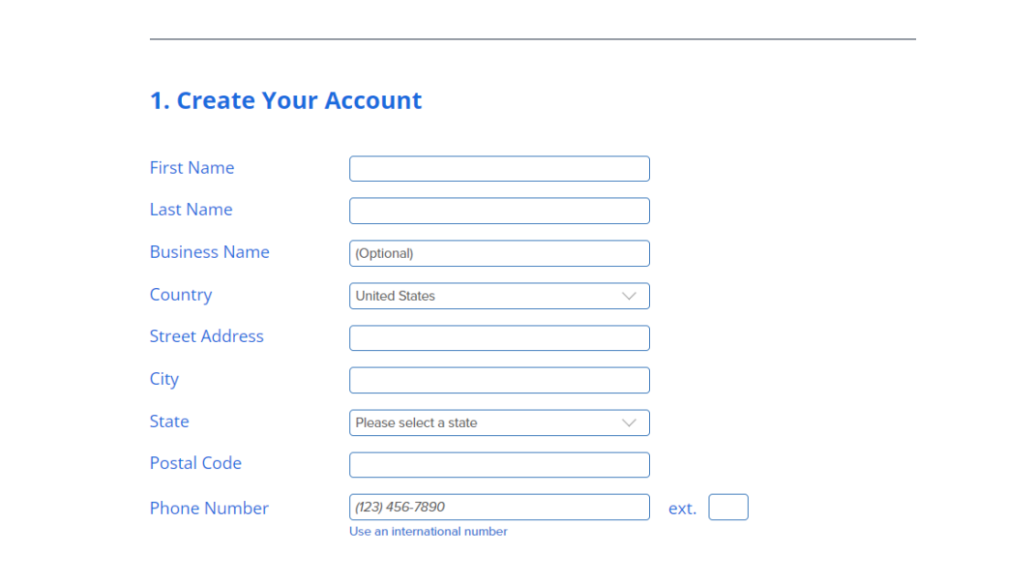
Fill out your billing details on the registration page.
. You will also need to choose your hosting package and options.
- Every Bluehost account plan has everything you need to get your website up and running, including a free custom domain name, easy WordPress installation, web hosting, and custom email addresses (e.g. [email protected]).
- The 36 month package gets you the lowest monthly rate, while the 12 month package has a lower up-front cost.
- Uncheck the boxes next to the package extras except for “Domain Privacy & Protection”. While not strictly necessary, domain privacy keeps your personal information (name, address, phone, email) hidden from the public database of registered domain owners. “pic”
. You will then need to create your Bluehost account and password.
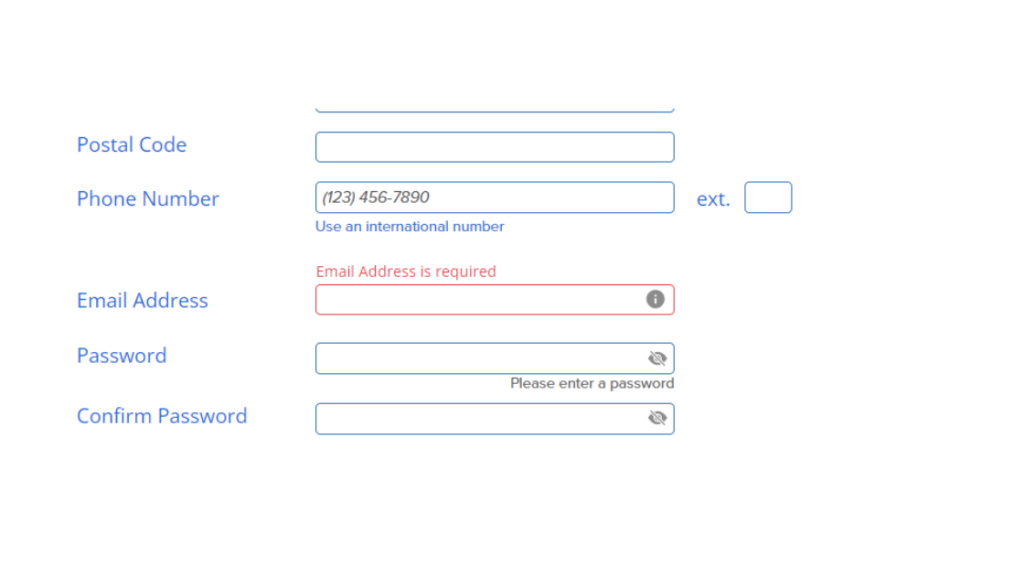
Once you do that you will be taken directly to the dashboard.
. Install the WordPress platform
Now the system will install WordPress automatically. Once the install is complete click the blue “WordPress” button to be logged-in to the administrator area of your website.
Having trouble installing your website? Get help here
Step 3: Customize your website
Website customization involves altering elements such as color schemes, font sizes, or layouts, as well as adding or removing specific features. The objective is to empower users to craft a personalized browsing experience that aligns precisely with their unique requirements and tastes.
Logging in
If you are not already logged-in from the previous step, go to Bluehost.com and click “Login” on the top right to bring up the login screen. You can then login using your domain name and the password you set in the previous step. If you have misplaced your password you can reset it by clicking the “Forgot Password” link.
Once you log-in you will be taken to your BlueHost Portal. From the portal you can click the blue “WordPress” button to be logged-in automatically to your WordPress website.
Changing your website design
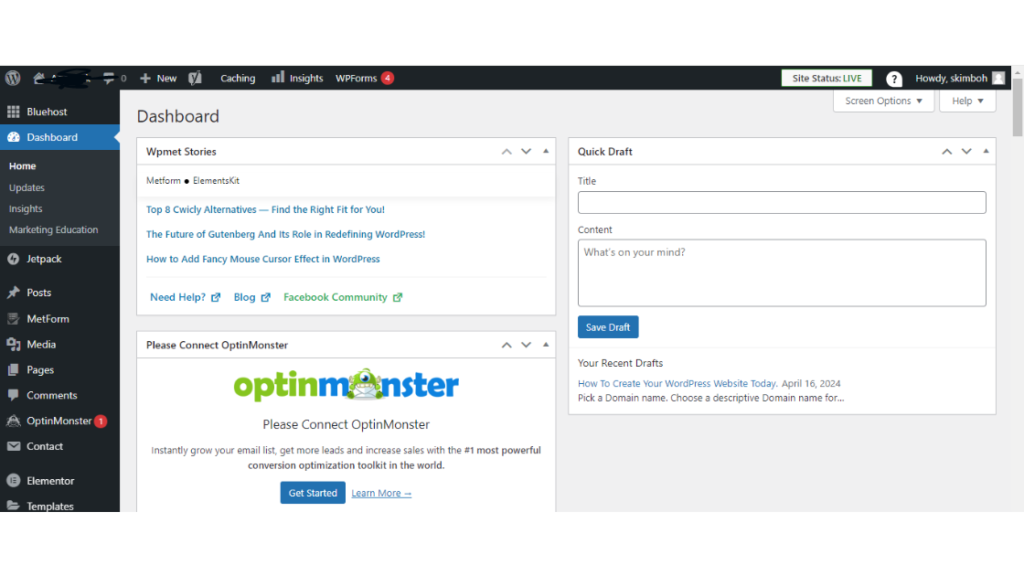
Once you login you will be in the WordPress website dashboard. This is where you can make any changes you want to your website.
Everyone has a different idea of how they want their website to look. One of the great things about WordPress website is that you can change your entire layout and design with just a few clicks.
In WordPress websites layouts are known as “Themes”. What is a website theme? Themes control the entire design of your WordPress website. To change your theme you are going to click on the “Appearance” tab on the left menu.
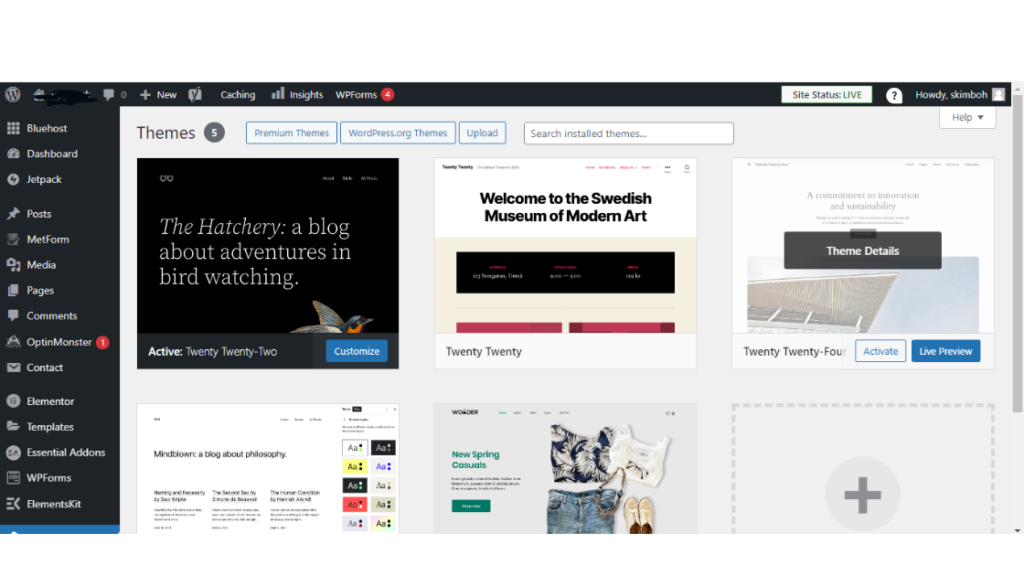
You will see several free WordPress themes are already installed on your website: Twenty twenty two, Twenty twenty three, etc. These are well-designed, clean-looking themes that can work for just about any type of website. In fact, many of the world’s top websites use one of these themes.
Unless you have a very specific design in mind for your website, I suggest you use one of these themes to start with. For our example, let’s use the “Twenty twenty two” WordPress theme. In order to activate the theme on your blog, hover over the theme and click the “Activate” button. That’s it! You have changed the entire design of your blog with just one click!
If you don’t like any of the themes that are already installed you can easily choose from thousands of other free WordPress themes. To install a new WordPress theme, click on the “Appearance” tab on the left menu and then click “Add New Theme”.
There are thousands of themes to choose from. You can change your entire design at anytime simply by activating a new WordPress theme. To find a theme you like, I suggest you click on the “Popular” tab and start browsing. When you find one that you like click the blue “Install” button.
Once the theme is installed click “Activate” to activate the theme on your website. To see your new theme in action, visit to your website and take a look!
Changing your theme is the simplest way to customize your WordPress website, but there are lots of other customizations you can do.
Step 4: How to write a blog post & publish it
Now that your website is up and running it’s time to actually do some marketing! Let’s create your first piece of content.
Go to the left menu and click on “Posts”.
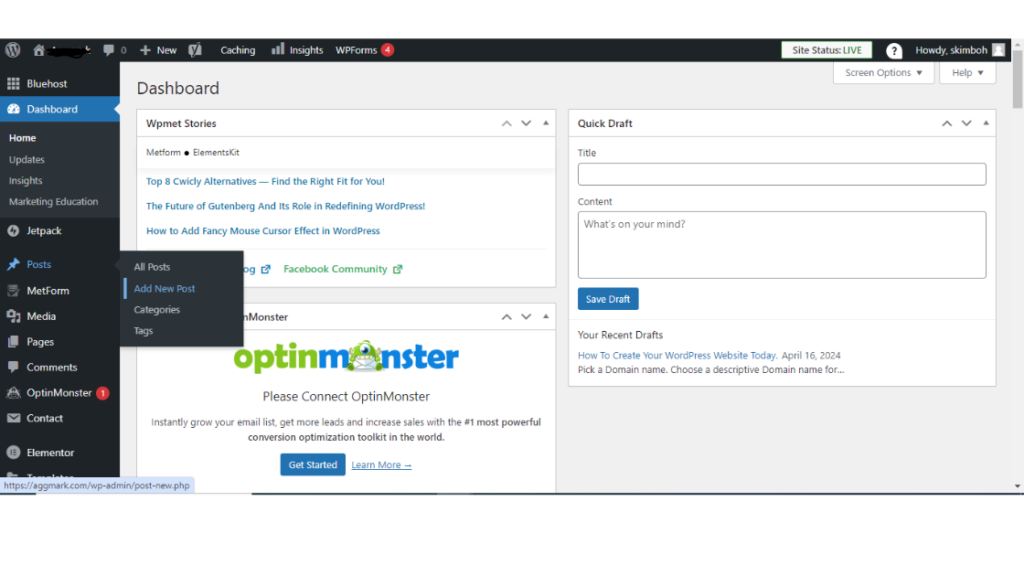
You will see there is already a post there. This is a default post on every new WordPress website, and we don’t need it. To delete it click “Trash” just under the post.
To begin writing a new post, click the “Add New Post” link.
You are now on the post editor screen. Enter the title of your post in the top box and then begin writing your post in the lower box.
If you would like to add a picture to your post, click on the “Add Image” icon and click “Upload” to upload a picture from your computer. You can make adjustments to the picture size on the next screen. When you are ready click “Insert into post” to add the picture.
Once you have finished your post just click the “Publish” button on the top right side of the screen to publish the new post.
Content That Should be on Your website
There are two main types of content your website should provide: static and dynamic content.
Static Content: Your website should contain a few necessary pages explicitly designed to provide the visitor with the tools they need. The content on these pages is static, meaning – the content doesn’t change, or at least not very often. These are mainly top-level pages that can be accessed via a menu on your website.
These static content pages should be in place well before you launch your website to the world.
Important static pages to include:
- About (Us) – This page should include a summary of the awner(s) as well as a mission statement. Think about the answers to these questions: How did you come about and develop this business ? What do you want to achieve or offer to the world? What is your ultimate goal?
- Contact (Us) – A contact page provides the visitor a place to reach your business which, in turn, provides the visitor with the reassurance that you are a real and reachable business. You can add your physical address, phone number, and custom email address. Or you can utilize a simple contact form to keep your personal identifying information private. You should put links to all of your social media profiles here as well.
Aside from your website, which is generally introduced on the home/main page, these two all-important pages should be visible on your top (header) menu and easy to access. You can take a look at the top of this page to see how I have these pages included in the header menu.
Other static pages that are equally as important but less commonly thought of are:
- Disclaimer Page: If you intend to monetize your website, you must describe the ways you intend to generate income. This is an absolute must-have page that should not be overlooked, as per FTC guidelines. For example, if you are discussing and endorsing a product, and stand to profit by linking to the product, this relationship must be disclosed.
- Privacy Policy: If you collect data from your visitors in any way, you are required to add a privacy policy page that tells visitors exactly how you are collecting data, how you are using it, and if you are sharing that data. If you implement Google Adsense or a Google Analytics account on your website, a Privacy Policy must be used. This page is required by the GDPR (General Data Protection Regulation), and is included by default on your WordPress website.
- Terms of Service: If your website is also running a store or selling services, it is a good idea to have a Terms of Service page to lessen your potential liability.
These required static pages are typically linked to in the footer menu of a blog. They should, at the very least, be visible and accessible from the home page. Again, look at the bottom of this page to see how this looks in practice.
There are other static pages you can choose to include depending on what suits your website and business. Common static page examples are an advertising page to solicit paid advertisements, a donations page, a resource page to direct visitors to your favorite links within your field, and a page for submitting ideas and content.
Dynamic Content: Your dynamic content is your website blog and the most important content you have to offer. This is where you, as the owner, will infuse the blog with your brand of informative content that supplies your audience with knowledgeable tips, facts, opinions, and stories. This is how you engage your visitors and keep them coming back for more.
Your blog content should be regularly submitted at specific intervals. Waiting months to create content will never build a following. Posting content weekly and driving traffic to these posts will help build your brand.
How to write great blog content
Each post should be lengthy, informative, and engaging. It’s not always easy to come up with new blog post ideas on a regular basis and you are free to mix up the tone and even the subject matter to keep things lively and interesting. It’s your space, after all. But there are a few elements that each and every piece of content should endeavor to include.
Define the Content: Create an alluring post title that stimulates curiosity and encourages clicks. Use the first paragraph of your post to clearly define the topic of your article and provide a possible hook to keep the reader reading.
The Longer the Better – But Break It Up: The more information and detail you include, the better. But visitors will begin to skim if the content contains lengthy paragraphs a mile long, and will pop out faster than they came in. Visitors enjoy tidbits. Keep your paragraphs short with spaces in between, use lists and standout quotes, use images, and always include headings and sub-headings so that visitors can find what they’re looking for.
Engage The Reader: At the end of each post, a common tactic used to engage visitors is posing a meaningful question to your audience and asking them to reply in the comments. This simple measure can increase engagement tenfold.
Original Content: Your content should always be original. Never plagiarize – you will eventually be called out on it and could even face consequences. Your content should come from your heart, your brain, your knowledge base, and your experience. You can get topic ideas from others in your field, but make sure the content comes from you.
Original Photos: While it is easy to include stock images from free image sites, it is even better to include your own photos and graphic work. Another idea is to take free images and manipulate them with a free photo editor.
Edit Your Work: Your blog content should be sufficiently edited. Nothing says unprofessional like several typographical and grammatical errors. If you need a few refresher courses in grammar, consider using a writing application.
Publishing Your WordPress website
When you are ready to make your website public for the first time, just click the “BlueHost” menu at the top left of the menu in your WordPress dashboard then click the blue “Launch” button to remove the placeholder page and launch your website.
Congratulations! You now know how to start your own website and sell your own products and services!
Step 5: Promote your website
Creating a well-designed website and showcase great products and services is just the start. In order to get visitors to your website you will need to spend some time promoting it, especially when you are first starting out.
The strategies below will help get your website in front of more people. You don’t need to use every strategy – try out a few and see what works well for you.
Alert Your Inner Circle
The very first people who should become aware of your website are your inner circle. This includes family, friends, and colleagues within your Niche. Encourage them to become followers, ask them to mention your new website, and – most importantly – thank them.
Use Social Media
While you don’t want to overdo it, you still want to create accounts with the “biggies” like Facebook, Twitter, YouTube, Pinterest, and Instagram. You should post a link to your newest content on your accounts, but you can also post relevant news and links to other sources that your readers may find interesting. Don’t forget to use hashtags and engage with your followers!
One of our favorite ways to get visitors to our website is to post links on our social accounts, like Facebook and Twitter. This is great, because not only do your friends see the link, but if your friends share the link with their friends it automatically multiplies your visitors. If you have created high-quality content on your website then social media is the best way for your website to go viral.
Comment on Other websites
Find other websites in your community and engage with them. Using the comment section, introduce yourself and leave engaging and constructive comments. Many will allow you to leave a link to your blog. After creating relationships with prominent websites in your community, you will find yourself within their ranks quickly.
Engage with Your Visitors
When your visitors leave comments on your posts, always engage with them. Reply to their comments and questions, give them “likes” and affirmations. When it is obvious that the author cares about his/her community and readership, visitors are naturally encouraged to return.
Collaborate with other websites
Become enmeshed in your community by collaborating with respected members of your field. Collaborating includes guest posting, promoting each other’s products, and services, and regularly interacting through comments and social media.
Post Regularly
Post content regularly. Create an editorial calendar and stick to it. Post at least once per week to start, If you have long lapses between posts, your followers will drop off and your growth will be severely hampered. It’s not easy to post on a schedule, but it’s something you absolutely must stick to.
Create an Email List
In addition to getting new visitors to your website, you will also want to make sure your current visitors are coming back. This is where email marketing plays a big role. By collecting the email addresses of your visitors (with their permission of course), you can then notify them when you post new products and services on your website. This keeps people coming back to your website, which not only gives you more visitors over time, it also allows you to build a closer relationship with your visitors.
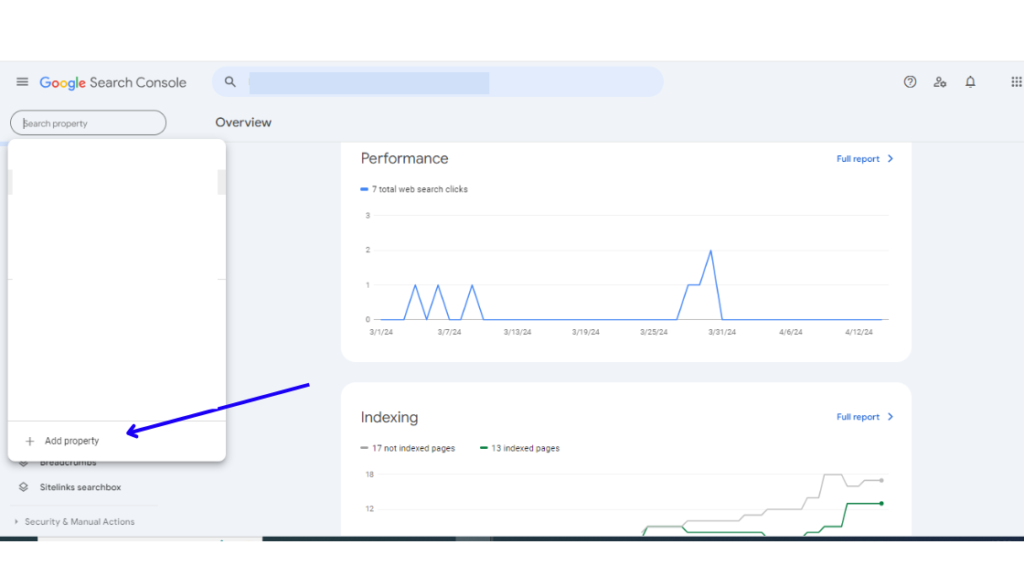
Optimize your website for search engines
You want your website to appear in search results as soon as possible.
Google: Sign up for a Google Webmaster account and open the Search Console. To add your website, click “Add Property” and follow the steps to add your website.
Bing: Sign up for a Bing Webmaster account and add your website.
Submitting your website is the first step in process known as search engine optimization (SEO).
Keep in mind that with a brand new website your traffic will be minimal to start with. However, this will change over time as long as you continue to add informative and relevant content to promote your products and services on a regular basis.
To optimize this process, each page of your website should include these fundamental elements:
- Header Tags: Section headings and subheadings should be wrapped in header tags. To do this, click on the left item of the block you are writing in and change it to “Heading”. You can then choose from H1, H2, H3, etc.
- Categorization: Your products and services should be clearly categorized into specific and relevant categories. In the post editor screen, click on “Document” on the right menu, and then go down to “Categories” and “Add New Category”.
- Permalinks: Each website page or post “slug” is the end portion of the URL. You want to make sure each page or post has a defined slug and doesn’t end with an article number. You can easily change this in your WordPress website dashboard by going to “Settings” -> “Permalinks”. Select the “Post Name” option and click “Save Changes”
There are many more factors related to websites to consider, such as installing something like the Yoast WordPress plugin, but these are the big ones that will help improve your search rankings sooner rather than later.
For more tips on promoting your website make sure to check out my post on Content Marketing Strategy for Websites: How to Create and Promote Engaging Content
Step 6: Make money from your website
Once you have put in the effort of creating great website content and promoting your products and services, making money from your website is actually the easy part.
Websites have the potential to be extremely lucrative, but don’t assume that you’re going to start making money in the first week, or even in the first month. It could take six months to a year to start seeing a steady stream of income. Your website need some serious work and dedication, but once you develop a large enough and dedicated following, there are several methods you can employ to monetize your website.
Sell advertising space
Once you have a popular website, advertisers will be hounding you for the opportunity to advertise. The best way to take advantage of this situation is to use Google Adsense. Google finds the advertisers for you and all you have to do is place the Google Adsense code on your blog to start running ads. Google Adsense takes all of the hard work out of the process and just cuts you a check.
Sell affiliate products
An affiliate program is a commission-based way to advertise. When one of your rfolloers clicks on a link on your website, they get sent to an advertiser’s site and you earn a commission if they purchase. Affiliate links are a nice way to earn income through the use of product reviews. However, you must remember to disclose that you are an affiliate for the product.
Selling Products and Services
Selling your own products and services directly on your website is a great way to increase your income. As your website grows and you begin to see a wide customer base, your products and services will begin to sell themselves.
Use the sidebar of your website to increase the visibility of what you sell using visual images and a link to your storefront page.
Sell digital downloads
Ebooks, video tutorials, and e-courses are the most commonly consumed digital materials sold by website owners or bloggers. With little to no overhead and no shipping costs, you can keep the price low and inviting.
If you are extremely knowledgeable in your field of service, an ebook can practically write itself. Give it a try, you might surprise yourself!
Sell memberships
Another way to monetize is by creating membership options on your Word Press website. This allows you to offer members more exclusive products and services only available with a paid membership. For example, you could offer great discounts on new products, unlimited downloads of digital goods, free consultations, a private network or forum where community members can mix and mingle, and private content available to members only.
There are many ways a website can capitalize on popularity and traffic. Choosing the way you monetize from your website depends on your goals and the purpose of your website. Those who are selling services, physical goods, and digital goods, for example, may not want to participate in affiliate programs where traffic could be lost to another site.